

While updating my EOP best practices post (which you most definitely should read), I was thinking about a task that I get asked with some regularity (not as much as when I was in the field consulting, but still pretty regularly). This task? sending an email manually with…wait for it…telnet.
Yes, there are times when it’s still good to know how to do the things under the covers. Here’s where you can learn.
Overview
Email, in its modern incarnation, turns 40 this year. There’s a lot of history behind it–as someone who passed the 40-year milestone quite some time ago, I can relate. You can read some in my EOP Best Practices post and see a much more in-depth take at Wikipedia.
The essentials are this:
- The Simple Mail Transport Protocol (SMTP) is the protocol that defines how email transactions should take place.
- SMTP servers generally answer on TCP port 25, though they can be configured to answer on other ports as well. Secure sessions may be handled as opportunistic TLS over port 25 or by using the secure port 587.
- The transferring of an email happens through a series of commands issued from the sender’s system to the recipient’s system.
So, now you have it.
SMTP Commands
SMTP has several commands available. Here’s a quick breakdown on the most popular ones:
HELO / EHLO
HELO and EHLO are used to tell the SMTP server you’ve connected to that you’re ready to start a conversation.
Syntax:
helo clientdomain.com
ehlo clientdomain.com
It’s customary to use the client’s domain as the argument for the HELO/EHLO command. If the transaction is successful, the server replies with a 250 response code.
MAIL FROM
The MAIL FROM command tells the SMTP server who the RETURN-PATH sender is (also known as the envelope sender). Quotes are optional around the sender’s email address.
Examples:
MAIL FROM: "sender@senderdomain.com"
MAIL FROM: sender@senderdomain.com
The RFC doesn’t require the sender to specify a real address or use the domain that matches the HELO/EHLO, though some spam filtering technologies will attempt to check the reverse path for permitted senders. If the server accepts the command, it will reply with a 250 response code. A message can only have one MAIL FROM command.
RCPT TO
The RCPT TO command is used to identify one or more recipients on the target system. Each recipient will be added to their own command line. Like the MAIL FROM command, quotes around the email address.
Example:
RCPT TO: "recipient1@recipientdomain.com"
RCPT TO: recipient1@recipientdomain.com
RCPT TO: recipient2@recipientdomain.com
Typically, the recipient must be hosted on the same mail system that is receiving the mail. The target system may also be configured as a relay (which forwards the mail on to the final destination system). The server should reply with a 250 response code if the recipient is accepted. As a sidenote, RFC 5321 does mention that the server can reply with a 251 response code, indicating that the recipient’s address has changed and sending that information back to the client. It’s not common, but it is allowed.
If the recipient is not found or otherwise invalid, the server replies with either 550 or 551, both of which indicate that the mailbox is not found.
DATA
DATA is a command that’s used to tell the server that it’s ready to start submitting the actual content of the message. The DATA command itself has no arguments, but there are keywords (FROM, TO, SUBJECT) that can be used to identify fields of the message.
Example:
DATA
Subject: this is a test
Hi! I'm testing manual SMTP relay!
You can enter as much data here as necessary. Email clients can attach images and files using MIME (essentially, encoding the attachment as a text string.
After the sending of the DATA command, the server should reply with a 354 response code (indicating it is awaiting intermediate data). To end the content portion of the message, you need to insert a <CRLF> (return key) followed by a period (.) character on a blank line, followed by another <CRLF> (return key).
Example:
.
The server should respond that it has accepted the message.
NOOP
The NOOP command (No-Op) is essentially a status check. It can be used as a keep-alive with the receiving system to try to prevent disconnection due to timeout.
Syntax:
NOOP
Successfully executing the NOOP command results in a 250 response from the server.
RSET
If you need to start your message over for some reason, you can issue a reset (RSET) command.
Example:
RSET
I haven’t really seen it used in modern practice, but it is helpful if you mess up during an interactive SMTP session.
VRFY
The verify (VRFY) command can be used to determine if a recipient exists on the target system.
Example:
VRFY user@recipientdomain.com
If successful, the server should respond with a 250 status code and a message that the user is valid. However, most SMTP servers turn this feature off to limit the effectiveness of address harvesting techniques.
EXPN
Expand (EXPN) is a command that can be used to expand distribution lists and return a list of member addresses back to the client.
Example:
EXPN distributionlist@recipientdomain.com
Like VRFY, however, many systems choose to disable (or not implement) this command to reduce address harvesting.
Sending SMTP manually
A few common questions I get asked are “how do I send email manually” and “how can I test SMTP”? I’ve got good news for you–it’s pretty easy. We’ll step through it.
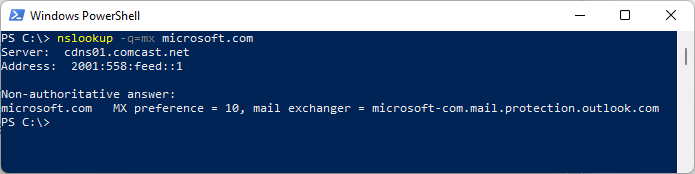
- First, you need to locate the MX host of a recipient’s domain (the easy way to do this is to use your own domain). From either a PowerShell (my preferred) or CMD prompt, run:
nslookup -q=mx <domain>
This results in a list of servers or endpoints that are responsible for accepting mail on behalf of the domain:
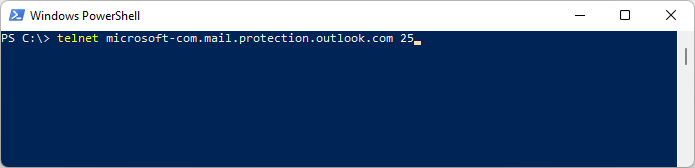
- With that in hand, you’ll need to connect to one of the servers listed in the answer section. For most people, that will mean using the telnet command (Windows 10 and 11 users will have to add the Windows Telnet feature).
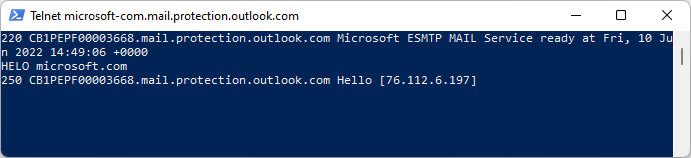
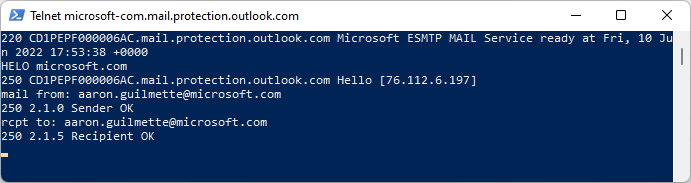
- You need to introduce yourself. Use either the
HELOor theEHLOcommand to do so.EHLOis an enhanced or extended hello, which introduces additional verbs that can be used. You can use either, but since we’re not using any advanced features, you can just go for the standard HELO. The syntax is:HELO <from domain>
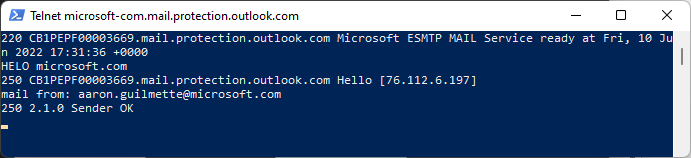
- Next, enter the
FROMinformation. This is the ENVELOPE or P1 address.MAIL FROM: <email address>
- After sender information, we’re going to need recipient. In this case, I’m going to be the recipient. This is the ENVELOPE or P1 recipient.
RCPT TO: <email address>
- Next, you need to use the
DATAcommand. This is instructing the SMTP server that you’re going to be sending content.DATA
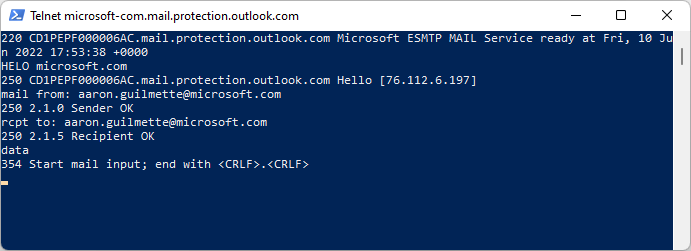
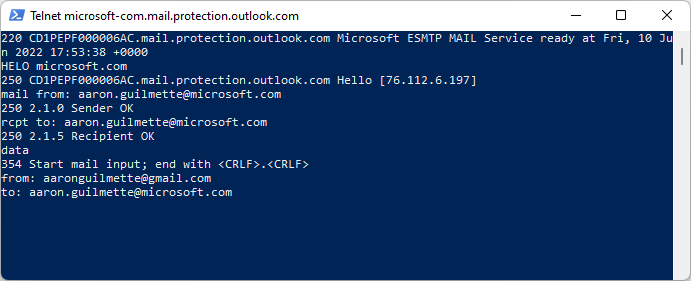
As you can see, the server replies with a354code, indicating that it’s ready to start receiving content. We’re also instructed on how to end the SMTP transaction (<CRLF>.<CRLF>). - Optionally, you can also fill out values for the P2 sender and recipient. This is the value Outlook will use as the display value, if present. If this value is not present, the envelope sender will be used.
FROM: <email address>
TO: <email address>
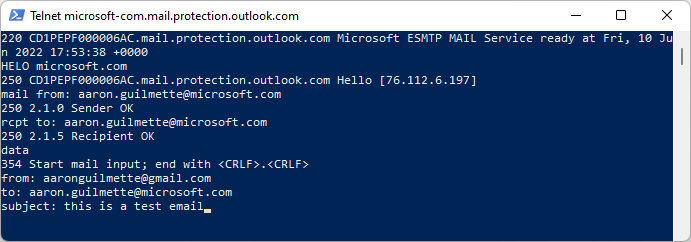
- Enter the keyword
SUBJECTto specify a value for the subject property of the email message.SUBJECT: <data for subject>
- Put any other data you want. When finished, enter the period character (“
.“) on a new line.
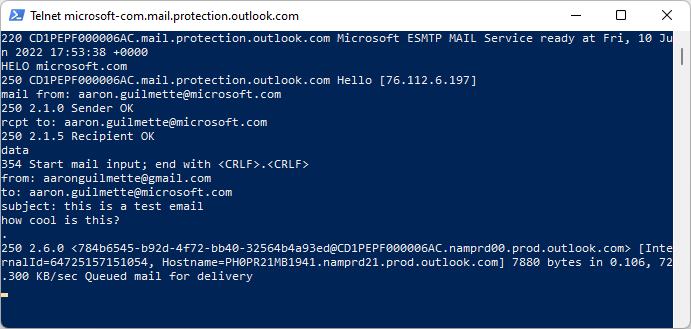
The server should reply back with a250response code, letting you know that the message has been accepted.
Voila! You’ve got mail!
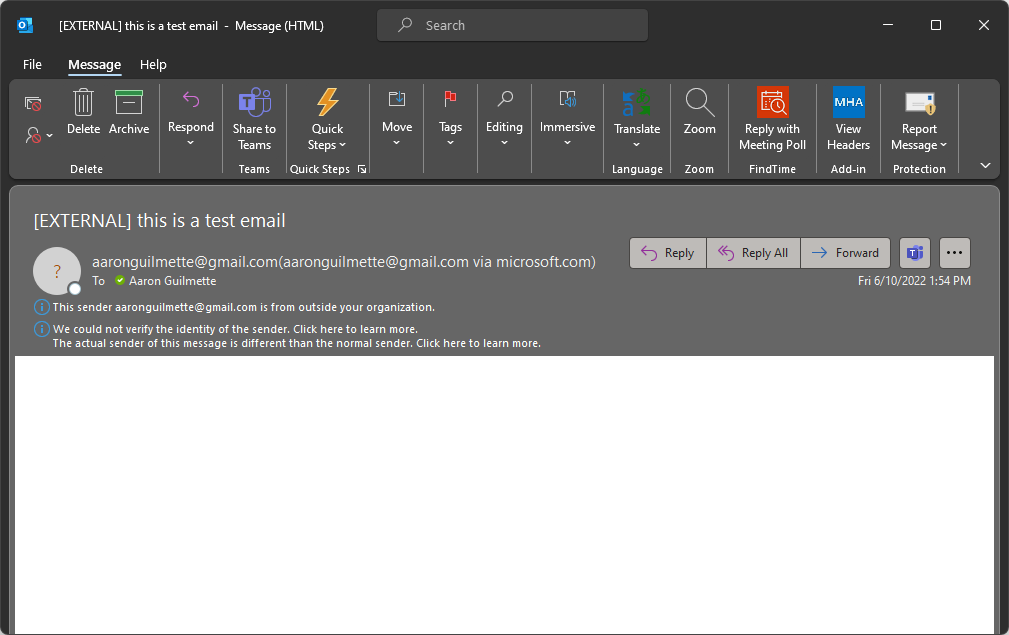
You’ll notice that I used a different P2 sender than my P1 sender, in an attempt to potentially trick the recipient into opening the message from me. This is a great example of why tools and configurations that take advantage of SPF, DKIM, DMARC, and SenderID are so very useful.
The message I received has a whole bunch of interesting tooltip notifications, indicating that the sender may not be who they claimed to be (from a domain perspective) and that the message originated from outside the organization:
Relay on!